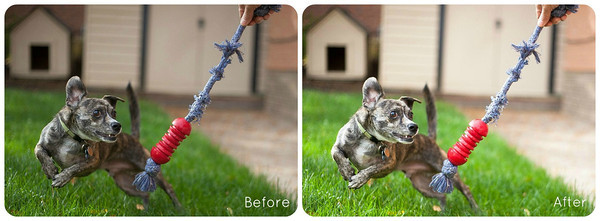
Even if you’re not exactly sure what aperture and shutter combination you need to make a good exposure, your camera will likely capture something that’s pretty darn close.
Just like people, though, cameras aren’t perfect.
When you do use a mode like aperture priority, for instance, there are times when you and the camera just aren’t going to get the exposure quite right. And that’s why we have various programs to edit photos after taking them.

There are certainly a number of good choices on the market for editing your photos. Some are free, some are pretty affordable and then others are quite costly. My editing and organization software program of choice is Adobe Lightroom.
I want to show you how I’d take an underexposed image into Lightroom and use its tools to adjust the exposure. It’s quick and easy and only takes a few seconds once you get the hang of it.
If you don’t have Lightroom, you should be able to find similar tools within the program you use, whether it’s Picasa, Aperture, Photoshop, etc.
Fixing the Exposure in 3 Easy Steps
Step 1. Auto Adjust
After opening Lightroom and importing my images, I go to the Develop mode and click on the “Auto” button under the Basic panel.

You won’t always like the results that Auto gives you, but the beauty of Lightroom is that:
1) Your actions are reversible and
2) Your edits are nondestructive, meaning you’re not actually making changes to the image itself, but are saving the changes you want to Lightroom’s Catalog.
After clicking “Auto,” you’ll want to check out your image. Does it look better to you or worse? If better, leave it. If not, simply click “Reset” or Ctrl + Z to undo.
Step 2. Adjust the Exposure Slider
The next step is to use the Exposure slider, which is just below the “Auto” button.
I like to play with this while looking at the Histogram. The Histogram will give you a visual representation of how the image was exposed. In other words if you’re captured a lot of dark, light or in between tones.
Your image is typically underexposed if all of the peaks are more prominent on the left side of the graph and overexposed if they’re prominent on the right.
The shape of the Histogram doesn’t matter so much (meaning you don’t always have to get a bell-shaped curve – we’ll talk more about Histograms later), but you usually don’t want spikes on the far left or right side, because then you’re losing details.
Looking at the Histogram in the image above, you’ll see that the peaks are more pronounced on the left side. And looking at the image itself, you can see that it is in fact underexposed. I wanted to fix this, so I needed to move the Exposure slider to the right to brighten up the image.

The result is that the curve of the Histogram is more evenly distributed across the x (horizontal) axis and my image is looking better and brighter with just that one adjustment.
After that adjustment, however, the blacks are looking a little washed out to me. Let’s fix that.
Step 3. Adjust the Highlights, Shadows, Whites & Blacks Sliders
When I bumped up the exposure so the Histogram was more even, I had the unwanted effect of the blacks getting a little too light for my taste.
The next step in my process is to fine tune the exposure by adjusting the sliders directly below Exposure and Contrast until the image looks good to me. These are the sliders I play with:
- Highlights
- Shadows
- Whites
- Blacks
(NOTE: These sliders actually changed from Lightroom 3 to 4, but they have similar outcomes. You’ll just have to play with them to see exactly how they work.)
In general, I tend to like my images with the Highlights & Whites increased a little and the Shadows and Blacks decreased a little. It tends to give the image a bit more pop and definition.

As a rule, you’ll want to watch your highlights and shadows and make sure you retain detail in those areas. But sometimes artistically you may want to blow out the highlights, for example, if that’s the look you’re going for. Don’t get overly concerned about always needing to keep detail in the highlights or shadows.
(Optional Step 4. Adjust the Tone Curve)
This last step in adjusting the overall exposure I consider optional because I often don’t do it myself.
Because I’m of the “subtler is better” mindset, I typically tend to do minimal adjustments on most of my images, so I don’t always feel the artistic need to adjust the tone curve. But in this case I’ll adjust it slightly to show how I would do it.
As I mentioned in Step 3, I normally like my Highlights increased (made brighter) and my Shadows decreased (made darker).
So to further tune my image using the Tone Curve, I slightly increased the Highlights and Lights while slightly decreasing the Darks and Shadows.

And I’m done!
Here’s the before and after again:

Additional Tips to Keep in Mind When Editing
Make an Adjustment, then Dial it Back
In the beginning when you’re getting to know how your adjustments affect your image, it can be fun to wildly move the sliders from the far left to the far right to see what changes occur when you do that. But you probably won’t like the look of the image with the sliders all the way left or right. It’s a bit much.
Once you do have a better understanding of each slider and its capabilities, a good habit to get into is to make an adjustment, then dial it back. Here’s what I mean:
- Slowly move the slider in the direction you want. For example, move the Highlights slider until it’s at, say, +35.
- As soon as it looks pretty good to you, then back it off slightly. In our above example, you’d move the Highlights slider left, decreasing it to, say, +30, which will lessen the effect.
The reason we want to do this is because a lot of us tend to overdo our adjustments – especially when we’re newbies – and the resulting image can look overly edited.
If you move the slider back just slightly from where you initially thought it looked good, chances are you’ll end up with a better image.
There’s No Right Way to Edit
While you should perform some of your editing steps in a certain order (for example fix exposure first, sharpen last), in a more general sense there’s no one way to edit your images. Any edits you do to your images after capture is solely your decision as the artist who made the image.
So don’t get too hung up on having to do things the “right way” when you post process your photos. Especially when you’re using a non-destructive and reversible editor like Lightroom.
To Sum Up
I hope that by showing you the steps I take to fix my exposure with help give you a starting point for fixing the exposure of your own images.
Once you’ve become familiar with whatever image-editing program you use, these steps will be second nature and it won’t take you very long to make these quick edits.
Take Action
The best to way to learn things is to do them yourself.
This next week, take a few images you’d like to fix (or go shoot some deliberately under- or overexposed images) and try to fix the exposure in your favorite editing program by following the steps I outlined.
Step 1. Auto Adjust
Step 2. Adjust Exposure Slider
Step 3. Adjust the Highlights, Shadows, Whites & Blacks Sliders
(Optional Step 4. Adjust the Tone Curve)
Share Your Work
Once you’ve edited your images, please feel free to share your before and after photos by putting a link to your images in the comments below.